I was out flying with my friend the other day when he screeched, “I’m running out of gas!” As he rapidly fell from the sky, I raced over to try and catch him.
“How are you running out of gas?” I asked. “Aren’t you using QuickSwap?”
He screamed, “Yes, when I can, but the token I want to buy isn’t listed on QuickSwap yet.” That’s when I realised: Not everyone knows that anyone can create a liquidity pool on a DEX. Like all decentralised exchanges, QuickSwap is permissionless, so anyone can add a new token or pair to the exchange at any time as long as they are willing to provide liquidity for the pair.
Never one to just let my friends fall from the sky, I decided to help him out by creating a listing for the token he wanted to buy. Before I write out a step-by-step guide on how to create a new exchange listing, let me just say that this is not an endorsement for the token I’ll be using in this example. I have done no research on $SPELL. All I know is that I like the name; dragons and spells seem like they should go together.
Disclaimer: I have no idea what the token is about. I’m only using it because it’s the token that my friend wanted to buy, and it isn’t already listed. This is the case for every token on QuickSwap. Because we’re a decentralised exchange, we do not conduct due diligence on assets listed here. Buyers should always do their own research!
How to Create a New Pair for an Unlisted Asset
Step 1: Make Sure that token you want to list is mapped to the Polygon (MATIC) Network
Some tokens are native to Polygon, others are native to Ethereum, BSC, Solana, Cosmos, or other chains. Before you can list a token on QuickSwap, that token will need a Polygon address.
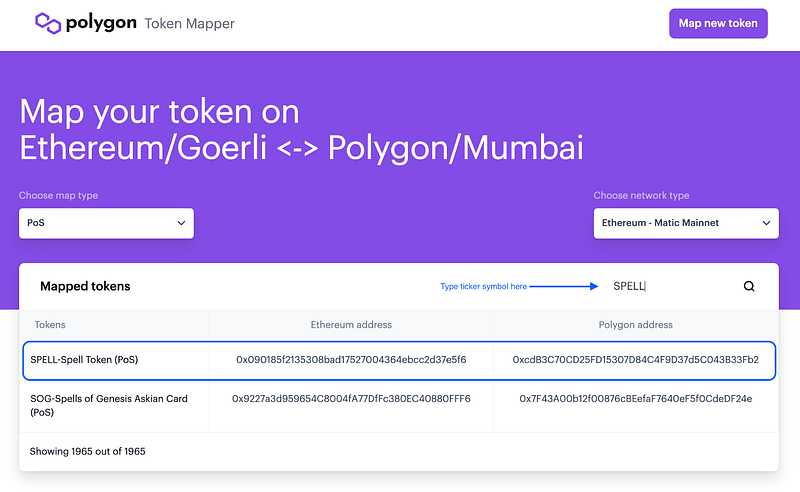
If it’s an Ethereum token, you can check to see if it’s mapped to Polygon at https://mapper.matic.today/.
Simply type the token’s ticker symbol into the search bar and press enter. Confirm that it’s the right token by checking its corresponding address on https://etherscan.io/.
If the contract address on Etherscan aligns with the address in the “Ethereum address” column on the Polygon token mapper, you’re good to go!
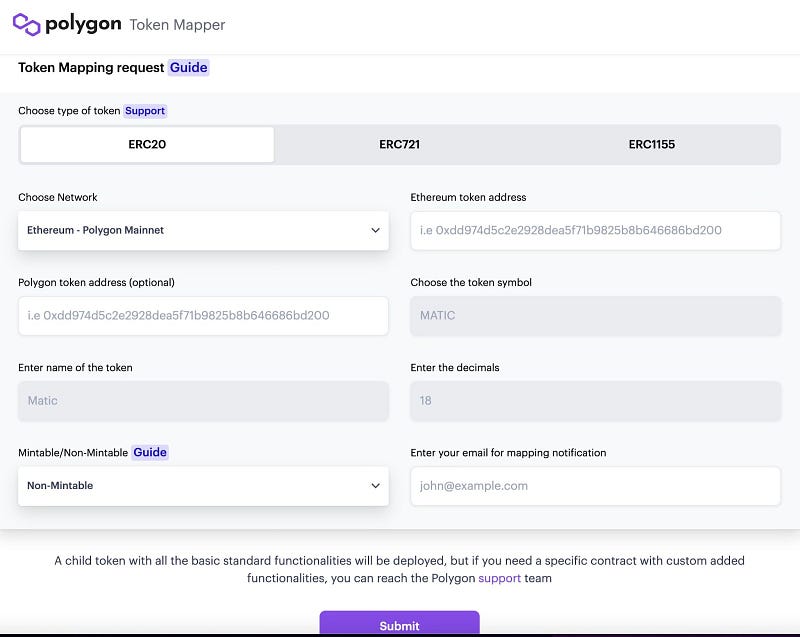
If the token you searched for does not yield any results on the Polygon token mapper, you can select the “Map new token” button in the upper right-hand corner of your screen.
Just fill out the form, click “Submit”, and Polygon’s team will get your token mapped and respond to you shortly.
Step 2: Acquiring the tokens for the pair you’d like to list
To create a new listing, you’ll need to have equal parts of each token you’d like to list on the Polygon Network. Since in this case, SPELL (the token we want to list) isn’t already on QuickSwap, you have three options for how to get it to Polygon:
- Buy it on Ethereum and bridge it over (both of which will require gas fees).
- Buy it on another Polygon DEX (which is not an option in this case because there is currently NO liquidity for SPELL on Polygon).
- Buy it on a centralised exchange that allows for withdrawals directly to Polygon, like Binance or Gate.io (again, that’s not an option in this case because none of those exchanges offer SPELL withdrawals to Polygon).
Thus, I will need to purchase SPELL on Ethereum and bridge it over in order to create a liquidity pool. We’ve prepared another guide on how to do that, so please follow along here if you don’t already know.
Note: Swapping $100 of ETH into SPELL on UniSwap cost $36.30 (0.009522 ETH). Bridging it from Ethereum to Polygon cost an additional $8.69 (0.002272 ETH) to initiate the bridge transfer, and $23.28 (0.0060389 ETH) to confirm the bridging. All in, my purchase and subsequent bridging of $100 in SPELL cost $68.27 (0.0178329 ETH) in gas fees alone. That’s outrageous! No wonder my friend was running out of gas. Luckily, products like Polygon and QuickSwap can help.
Step 3: Adding a Custom Token to MetaMask on Polygon
You probably already added SPELL (or whatever token you’re attempting to list) to MetaMask on Ethereum, but Polygon is a different network where the token has a different address. You will need to add your token on Polygon to view it under your assets tab on MetaMask.
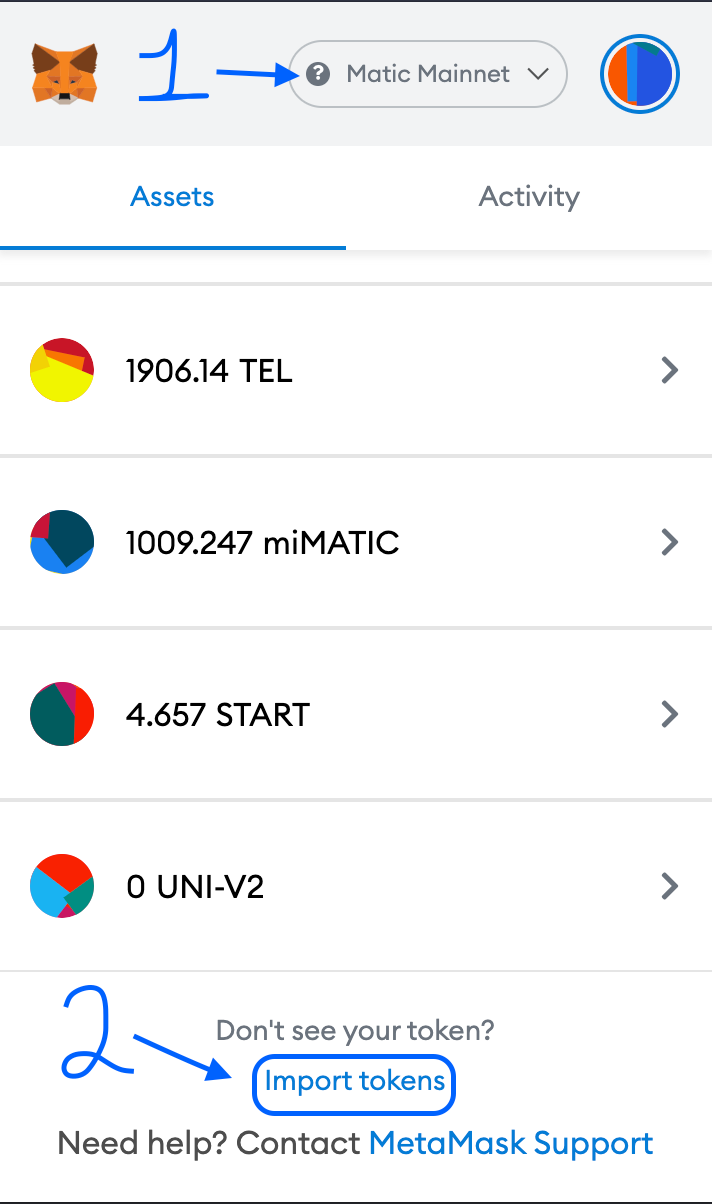
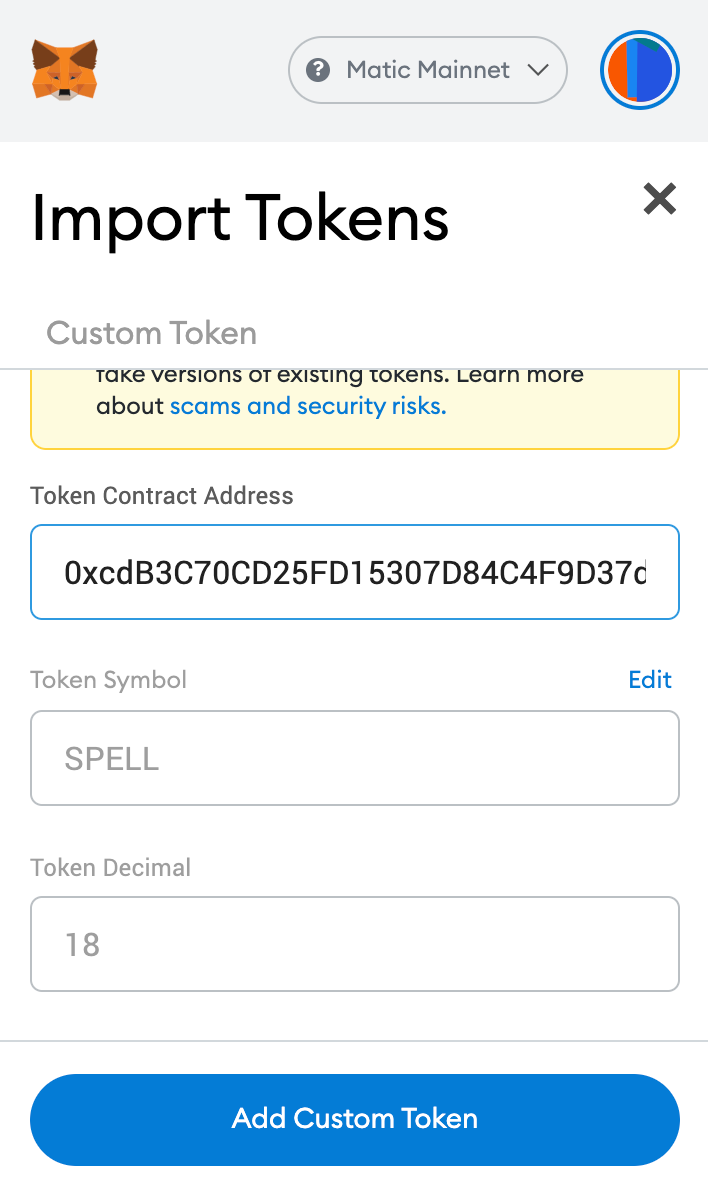
Open MetaMask and ensure that you have “Matic Mainnet” selected as your network. Scroll to the bottom of the “Assets” tab, and click “Import tokens”. Find your token’s Polygon address on the Polygon Token Mapper we visited earlier. Copy this address to your clipboard.
SPELL’s Polygon address is: 0xcdB3C70CD25FD15307D84C4F9D37d5C043B33Fb2.
Paste the token’s address into the “Token Contract Address” field. The other fields should then auto-populate. Select “Add Custom Token”. On the next screen, click “Import Tokens”. You should now see your new token’s balance in MetaMask under the “Assets” tab.
Step 4: Creating a Pair on QuickSwap
Back on QuickSwap’s interface, click on “Pool” in the top menu.
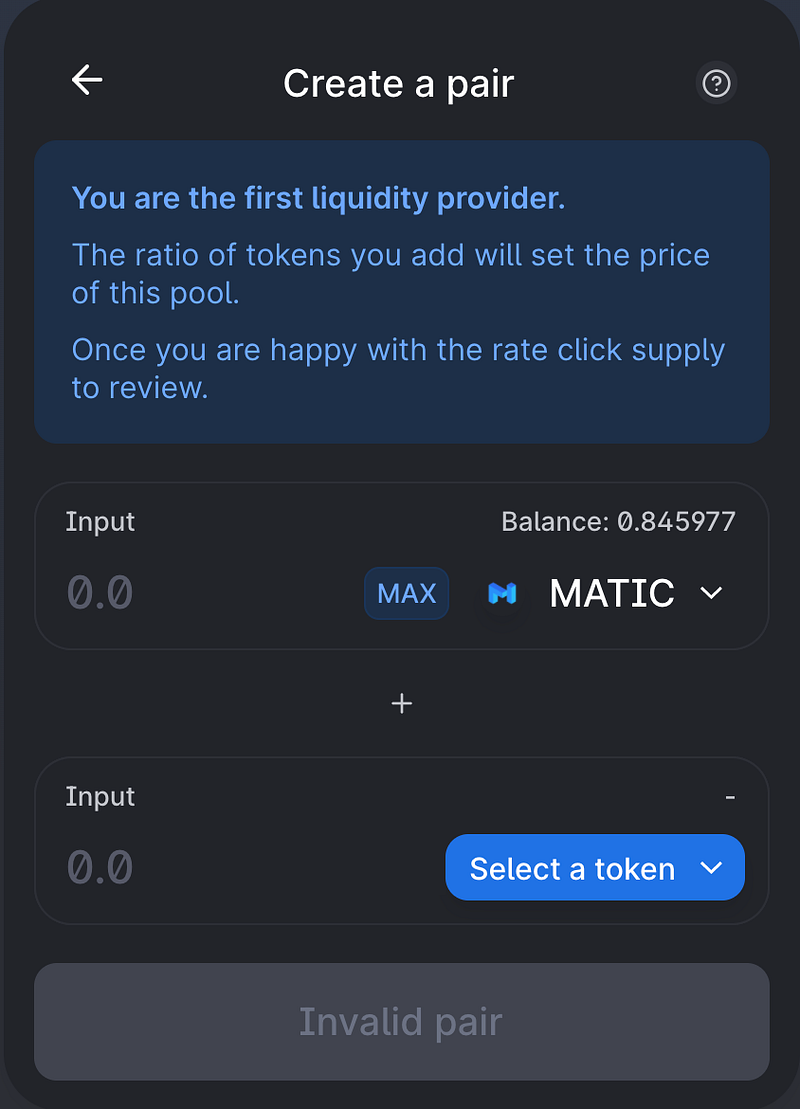
Then, select “Create a pair”.
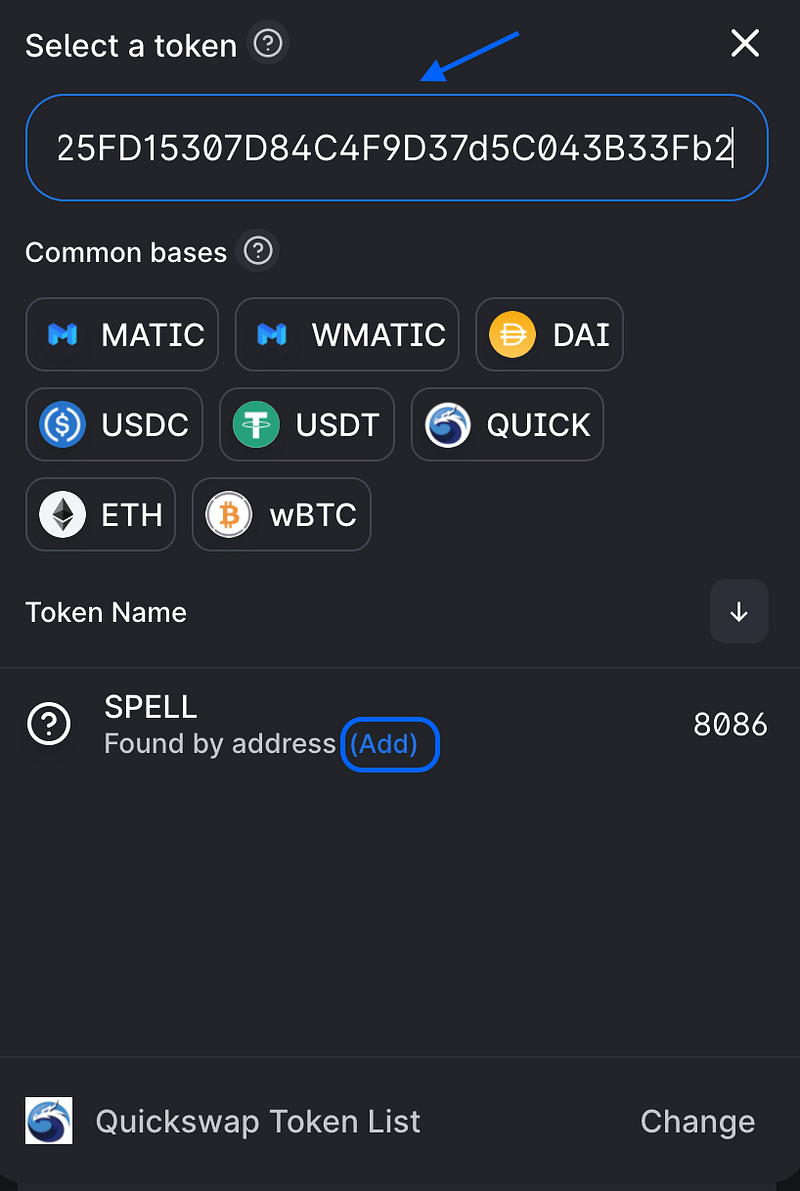
I’m going to create a USDT/SPELL pair, so from the top menu, where you see MATIC in the above photo, I’m going to select USDT. Then, from the bottom menu that says, “Select a token”, I’m going to paste in Spell’s address, and then click “Add”.
Step 5: Adding Liquidity for the Pair
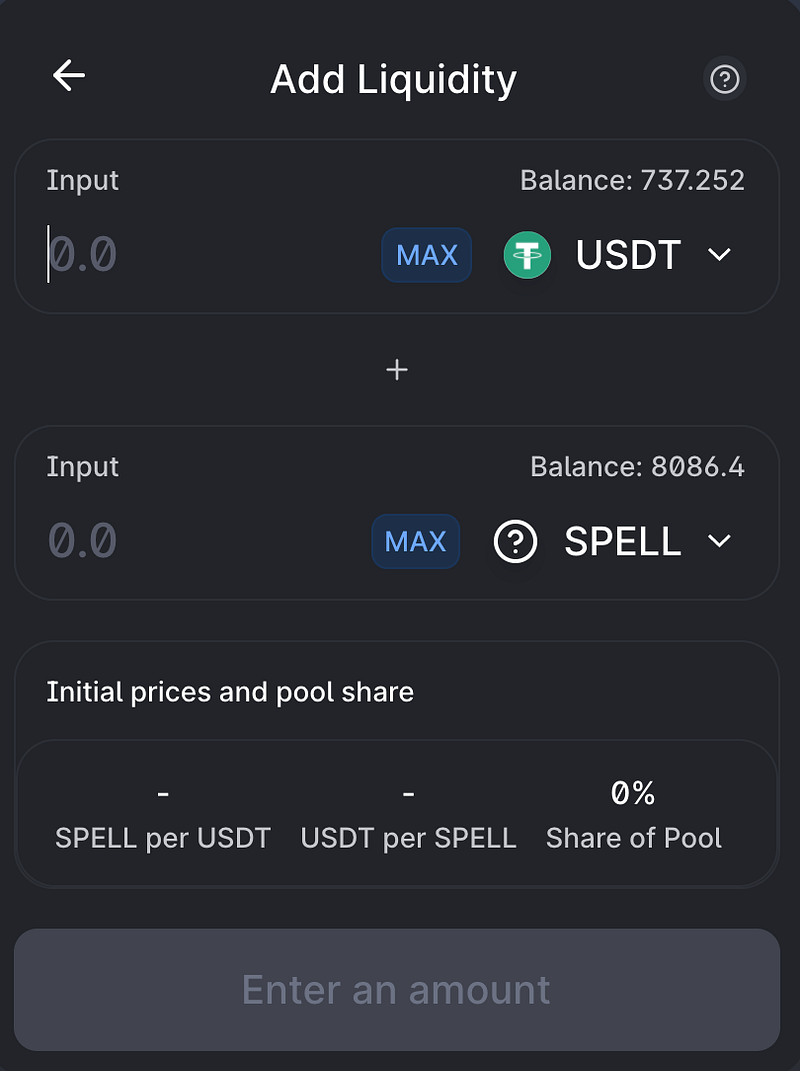
When you create a new pair, you are the first liquidity provider. Because AMM (Automated Market Maker) DEXs, like QuickSwap, rely on arbitrageurs to balance out token prices across exchanges, it’s very important that you get this ratio correct. If you don’t, arbitrageurs and the bots they’ve programmed to recognise price disparity between exchanges will quickly wipe out your assets.
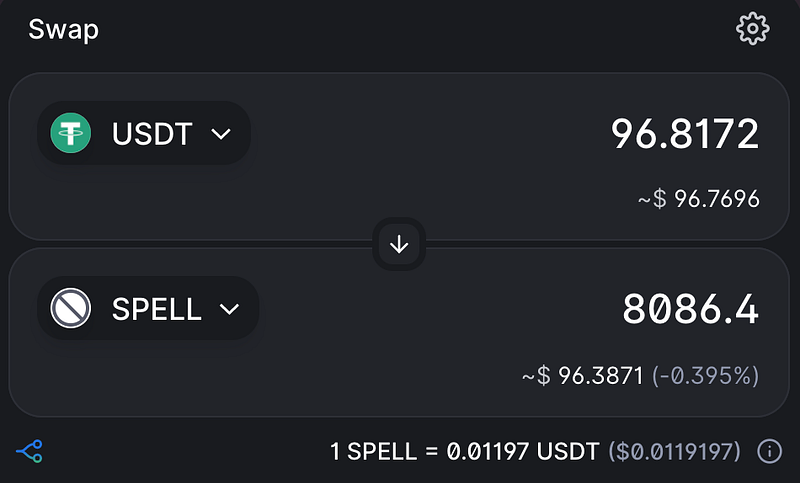
To ensure that I have the correct ratio, I’m going to check on UniSwap.
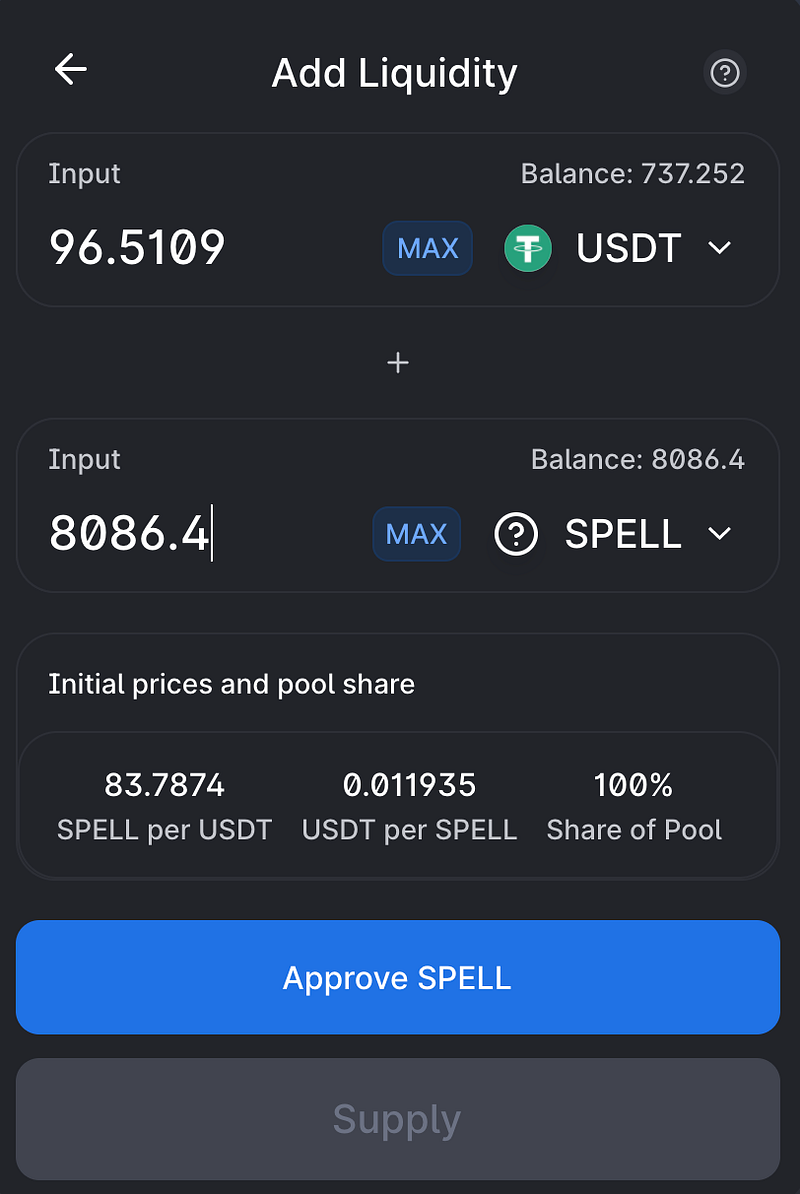
I enter my max amount of SPELL and find the corresponding amount of USDT. Then, I enter those numbers into QuickSwap.
I select “Approve SPELL”, confirm the transaction in the MetaMask window that pops open, then click “Supply”.
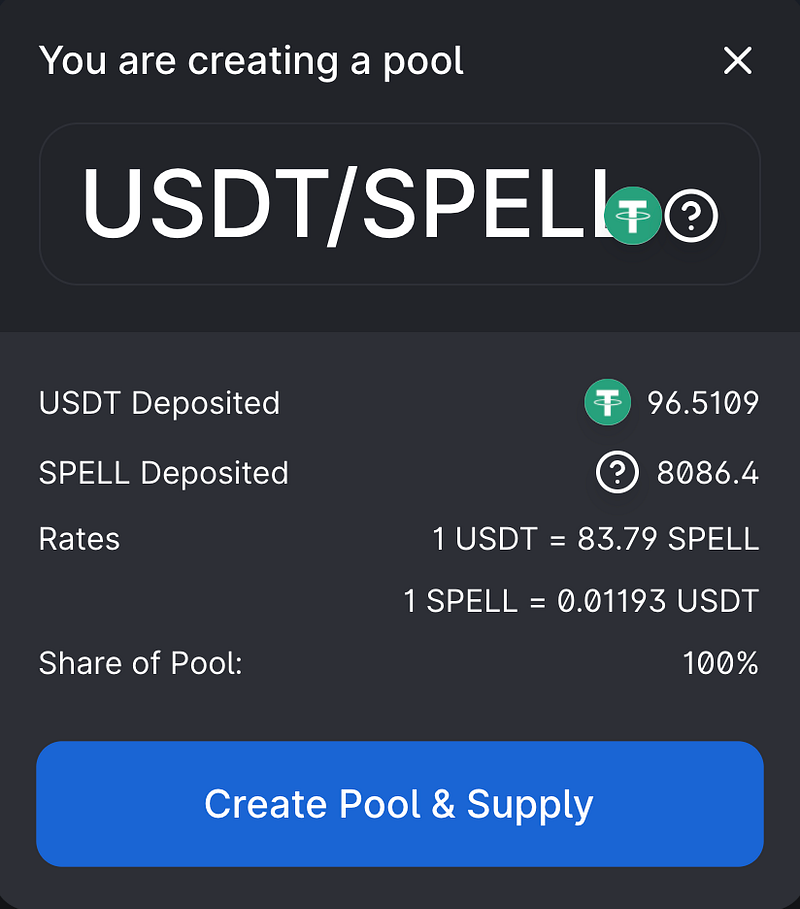
I’m reminded that I’m creating a pool. I select “Create Pool & Supply”. Then, I confirm again in MetaMask.
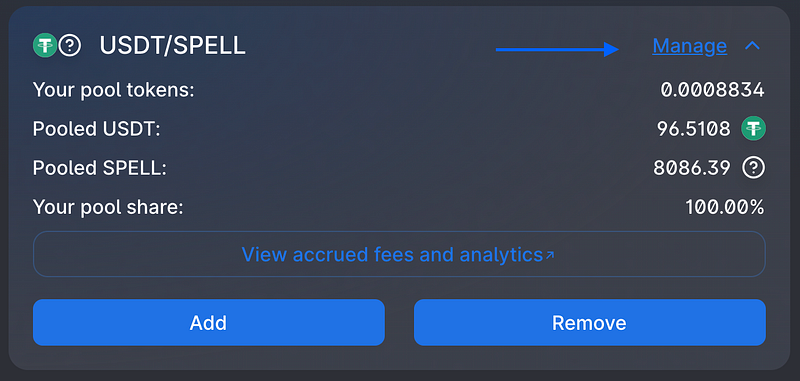
Under the Pools tab, I can now see the USDT/SPELL pair that I created. From here, I can click “Manage” to add or remove liquidity. I can also see the percent of the pool that I’m providing. From now on, if anyone trades USDT/SPELL on QuickSwap, I’ll earn my share of the 0.04% trading fees the DEX collects — as of right now, my share is 100%, but that could easily change if the SPELL team or community decides to add additional liquidity.
Step 6: Getting your Token added to the Default List and Liquidity Mining Rewards
Almost every token that gets listed on QuickSwap wants to be added to the default QuickSwap Token List so that buyers won’t have to copy and paste the token’s address into the interface and so that the token’s logo will be visible. Unfortunately, QuickSwap cannot accommodate all requests to be whitelisted, but parties with the intent to add large amounts of liquidity and potentially participate in our Liquidity Mining Rewards and/or Dragon’s Syrup program should reach out to admins in QuickSwap’s Official Community Telegram.
With gas fees as they are, it’s no wonder my dragon-friend was running low. Hopefully, Ethereum’s upcoming ETH 2.0 launch will reduce gas fees across the board. But even ETH 2.0 isn’t enough on its own. Over a decade into the blockchain journey, developers and users alike are beginning to realise that one chain simply cannot accommodate all of the world’s transactions. That’s why Polygon exists to help Ethereum scale, and QuickSwap exists to assist our mother UniSwap to do the same.
I couldn’t just let my friend fall from the sky, and I’m certain that many dragons, dragonites, dragon riders, and dragon enthusiasts feel the same. If you’re among them, now you know how you can add liquidity for your favorite ERC20 token to QuickSwap to allow lightning-fast transactions for next-to-zero gas fees.
Let us know how you think we did explaining this process in the comments, and join us across social media to stay up-to-date on all things QuickSwap — Polygon’s most-established DEX.
Twitter | Telegram | Announcements | Medium | Discord| Reddit
By QuickSwap Official on December 15, 2021.
Exported from Medium on May 2, 2023.


